Self Healing Crystal Layouts – Crystal Healing
Table of Contents
Maryanne came to us the other day wanting to know how to go about using crystals. She had heard about ‘the laying on of stones’. This was more about having a professional crystal healing session, but she wanted to know how to go about doing Self Healing Crystal Layouts. These are also sometimes referred to as ‘healing nets’ and often as healing grids.
She was looking for something she could do herself, or maybe with the help of a friend. She just loves crystals and believes strongly in their power to heal. Still, she wanted to go further than just wearing them, carrying them and keeping them around her. She wanted to be a lot more involved in helping her family and herself to be healthy, happy and vital. And self healing crystal layouts seemed to be her answer.
We have found that many others just like Maryanne, don’t desire to be professional crystal healers, but they do aspire to be first-class in assisting themselves, their family and friends to heal with crystals.
Now, crystal healing using layouts is a big subject. So big in fact that it really requires something the size of a book, but we will do our best to provide an adequate understanding within the scope of this article: Self Healing Crystal Layouts.
When you use self healing crystal layouts, you set up some very specific and complex electromagnetic force fields (energy fields). These then proceed to re-polarise, re-balance and smooth out any fields that are misaligned.
Your body’s energy fields will be re-aligned and your chakras will be cleared and balanced. This aids healing and promotes an overall feeling of well being and may well prevent illness and dis-ease from manifesting in your body.
The First Step in Self Healing Crystal Layouts is to Know Your Crystals.
Maryanne had this part down pat. She knew many crystals by name and appearance and what their key properties were. Also what parts of the body and its energy systems they corresponded to. She also knew how and where to research for information regarding crystals and their healing properties. So selecting the right crystals to use was not going to be a problem.
Crystal Healing is First and Foremost a System Of Energy Healing.
Using self-healing crystal layouts is a very powerful way of performing healing on yourself or others. Its purpose is to clear and restore your energy systems and to release emotional, mental and spiritual blocks to your well-being.
One of the things that make crystal healing so effective is that your intent and desire to heal is just as important as your knowledge about particular crystals. Especially as crystals are benevolent and do no harm. Of particular importance is that crystal healing is primarily a system of energy healing, restoration and balancing.
Another benefit is that because healing energy can be channelled along the meridians, or your body’s energy highways and byways, this energy will be directed to where it is most needed.
Now, this is not to be used as an excuse for doing a shoddy job. You can’t just place crystals around willy nilly and expect to get a good result. Rather, we are saying not to get too hung up in selections and procedures. Crystal healing can be quite forgiving. However the more you know about the subject, the better your results will be.
When the energy systems of the body are aligned and in great working order – your physical, mental and spiritual bodies will follow suit.
By using crystals to help return your body to homeostasis, your inner natural healing power, immune and defence systems are allowed to fully do their job and keep you healthy.
Preparation and Setting Up for Your Self Healing Crystal Layouts
The more time and attention you devote to setting up your healing session, the more enjoyable it will be. None of these steps however are actually required for a crystal layout to work. Nevertheless, they work synergistically for a far better outcome.
- Firstly, find a quiet location where you are not likely to be disturbed.
- Prepare your space by making sure the area is thoroughly clean and well presented.
- Probably your safest position to conduct your Self Healing Crystal Layouts is on the floor.
- Make it comfortable to lie on by placing something like a yoga mat, a futon cover or a folded blanket in the middle of your chosen spot.
- Allow sufficient room for the extent of your crystal layout.
- Cleanse the area by smudging. Reiki practitioners may also do this by tracing their Reiki symbols in the room.
- Have some ambient music playing softly.
- Dim the lights, or preferably use some candles.
- Burn some favourite incense, or diffuse a relaxing essential oil blend.
- Independent of the crystal layout being employed, some like to set up a grounding and protecting grid by placing Tourmaline in each corner of the room.
- Determine what it is you wish to work on or heal. Choose your crystals.
- It’s a good idea to drink a glass of water before you commence with your layout. And be sure to drink plenty of water after doing a self-treatment as these techniques can have a detoxing effect on your body.
Some Additional Things to Consider:
- If you can have a friend attend and place the crystals for you, then so much the better. You might like to read: Do you need a crystal healing buddy?
- Some people like to include a cloth imprinted with a meaningful symbol to lie on and use in the session.
- Others also use this to form the pattern for their crystal layout. Some examples are – Aum or Ohm, Yin and Yang, figure 8, Tree of Life, Flower of Life, Pentagram, Star of David.
- You may find that some of the crystals can feel quite heavy, almost as though they are sinking into your skin. Others will feel so light that you aren’t sure whether they are still there or not. Still, others may feel very cold and yet others extremely warm, or even electric.
- Sometimes you may feel like you are floating, or experience inner visions of colour, or see exquisite patterns. And definitely don’t be concerned if you fall asleep. You obviously had some catching up to do.
- The time needed for healing and restoring balance will vary because each of us is different. Typically around 30 minutes is a good period of time for your Self Healing Crystal Layouts. However, follow your intuition. You may finish within a few minutes, or you may choose to stay and relax for a while.
- Another one of the good things about crystal healing is that you can’t overdo it. So, if you have an inclination for a couple of hours of basking in the energy field of your layout, you can do so.
- Always trust your intuition to guide you to the crystals and layouts to use, and the length of your session.
Crystals are Excellent for Self-treatment.
Crystal Layouts can be very powerful and are excellent for self-treatment, as well as for their use in professional healing sessions.
- You may further enhance your results by aligning your body with the earth’s magnetic field. Preferably have your head to the north and your feet to the south.
- Allow plenty of time for completing your layout and for returning to everyday consciousness.
- Be certain that you are properly grounded before resuming your normal activities.
- Oftentimes, several shorter sessions, say 5 to 10 minutes, conducted over several days, can be better than one longer session.
- You may further enhance your crystal healing layouts by including coloured sheets or cloths as a base for healing.
- Or some prefer just using a neutral white sheet to lie on.
Here are some examples of Self Healing Crystal Layouts.
Self Healing Crystal Layout – Body Balance Layout with Seven Clear Quartz Crystals
For this popular layout, you will require seven Clear Quartz crystals, either natural or tumbled and preferably around the same size and weight.
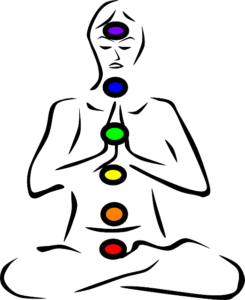
Lie down and position a crystal on each of the seven major chakra centres. For more information about chakras and their location, refer to A Simple Guide to the Body’s Energy Systems. An additional eighth crystal may be used at the earth star chakra.
If a crystal rolls to a different position a couple of times, leave it where it is. It is more than likely moving to where it needs to be.
Self Healing Crystal Layout – Aligning and Balancing the Chakras with Crystals
Many healers agree that this is probably the most popular crystal healing layout.
For this layout, you will need a variety of coloured crystals to match and balance each of the chakras. Preferably they should be approximately the same size and weight.
Lie down and position a crystal on each of the seven major chakra centres, as above. However, you will use these coloured stones instead of Clear Quartz for this layout.
You may use any crystal whose colour corresponds with a chakra. However, we have listed the most popular two.
- Earth Star, base of feet – Tourmaline or Smokey Quartz.
- Base – Red Jasper or Hematite.
- Sacral – Carnelian or Orange Calcite.
- Solar Plexus – Citrine or Yellow Aventurine.
- Heart – Green Aventurine or Rose Quartz.
- Throat – Blue Lace Agate or Turquoise.
- Third Eye – Lapis Lazuli or Amethyst.
- Crown – Clear Quartz or Selenite.
Self Healing Crystal Layout – Stress Release and Energizing Crystal Layout
This is an excellent layout to re-energise and to use for stress release.
You will need seven Clear Quartz crystal points.
To release stress:
This time, do not place them on your body; rather place them on the floor around your body, pointing outward.
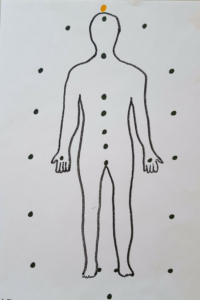
One above your head – at your shoulders on either side – at your knees on either side – one below each foot.
This will release stress. Five minutes is often sufficient. Again, you may stay as long as you’re comfortable. However, if you are also energising, you will require a similar additional amount of time.
To energise:
Turn the points inwards to recharge and energize. Lie still for another similar period of time.
Self Healing Crystal Layout – Hematite Shield – for Grounding and Protection.
In these modern times, it is particularly important for us to remain ‘grounded’ and connected to Mother Earth. This allows us to stand in the truth of who we are, to be ‘present’ in our bodies and maintain our inner balance. A ‘Hematite Shield’ is a very effective layout for grounding and protection. As well as for staying focused and keeping our identity in times of change. It is also useful for achieving the desired energy shift.
A Hematite Shield is a very beneficial layout for all of us and is most effective for people, who work in a negative environment.
This layout is best done on the floor. Some may prefer to rest their head on a small pillow. Once all the stones have been positioned, relax and stay in place for eleven minutes. You may want to set a quiet timer to know when the time is up. You may stay longer if you wish for the basic layout. However, if you are using the circular breath of the advanced version, keep it to eleven minutes.
You will need 24 tumbled Hematite stones and 1 Pyrite. You can get by with any sized stones; however, ideally stones around 25mm diameter are preferable and will give better results.
- For the basic layout:-
- One at the earthstar chakra which is about 15cms, 6 inches below the feet.
- One is located at the outside of each heal.
- Place one on each chakra.
- Pyrite at the crown.
- Set twelve around the body, placed about 15cms from the body – at eye level, shoulder level, solar plexus, hips knees and ankles.
- The remaining two are placed on the palm of each hand.
Self Healing Crystal Layout – Advanced Hematite Shield with Circular Breathing.
An advanced version of the Hematite Shield includes the addition of circular breathing. The benefits of this layout can last up to six weeks. Complete everything as above (the basic Hematite Shield) and as your eleven minutes commence, slow your breath down and breathe from your abdomen. Imagine your in-breath coming in from your crown and filling your body all the way down to the souls of your feet. Then exhale out through every pore of your body, working your way down to your toes, as though it were a sieve, and take this breath out to touch the Hematites that surround you. Repeat. This creates a circular pattern of breathing going around from your crown, out through to your body to your toes and back again to your crown.
Self Healing Crystal Layout – Amethyst Healing Layout – to Heal and Calm.
This layout may be used in any situation where physical, emotional or mental healing is required. Amethyst is a most versatile crystal and is particularly useful for creating a sense of calm.
You will require 8 Amethyst points or tumbled stones, preferably of a similar size, to provide a balanced energy flow. Odd sized crystals may produce a surging energy flow or a ‘rolling’ sensation.
For this Layout, place one Amethyst above your head and another below your feet. Place the others on each side of the body at the shoulders, waist and knees. If you are using Amethyst points face the points in towards the body.
20 minutes is a suitable time for this session, but use your intuition and judgement to find your ideal time. Afterwards hold a grounding crystal, or place it on the centre of your forehead, to ground you and refocus your consciousness.
As Amethyst balances and quietens the mind, you may become aware of an increase in psychic ability, imagination and a capability to visualize clearly, during your session.
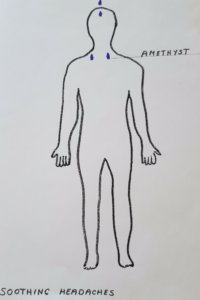
Self Healing Crystal Layout – Amethyst Healing Layout for Headache Relief.
This healing layout helps to free up blocked energies that may cause a headache and help to reduce the pain.
You will need 4 Amethyst points or tumbled stones.
This healing layout may be carried out on a bed as well as on the floor. Lie down comfortably and place an Amethyst pointing upwards, in the centre of your forehead on the brow chakra. Place an Amethyst, again pointing upwards, at either side of the base of your neck, just above the collarbones. Place the fourth Amethyst above the top of your head, pointing away from your head. You may relax in this position until your headache is gone, or at least until the pain is sufficiently reduced to go about your duties.
Self Healing Crystal Layout – Sunstone Healing Layout or Sun Energy – Energising.
Use this layout when you are lacking in confidence, personal power, or motivation. This layout can help to recharge your batteries and return vital energy.
You will need 6 Sunstone tumbled stones. You may also choose to lie on a yellow sheet or cloth.
Set two Sunstones out at arm’s length, one to each side. Place a third below your feet to create a triangle. Now make another inverted triangle by placing a crystal to each side, out from your hips, with another above your head. You have created a Star of David pattern, with the Sunstones encircling your body.
Lie back, enjoy yourself and imagine the sun shining down on you and filling you with light and sunshine. Stay for as long as you are comfortable; however 20 to 30 minutes is a reasonably suitable duration.
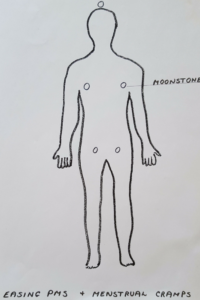
Self Healing Crystal Layout – Moonstone Healing Layout or Moon Energy – Relaxing.
This layout is very relaxing and allows you to bask in feminine or yin energy. It also helps to restore equilibrium when you have an excess of yang or masculine energy.
Use this layout when you experience a sense of unworthiness or reluctance in your energy flow. It is also great for tapping into your intuition.
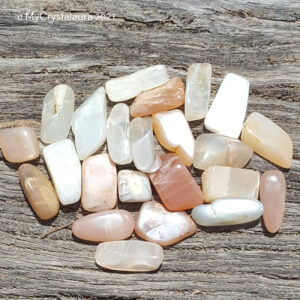
You will need 5 Moonstones and you may also choose to lie on a deep blue cloth.
Set them out in a circle to make a 5 pointed star. One above your head, one out from each hand and out from and below each foot.
As you relax, lying in the energy of Moonstone, imagine moonlight shining over you and filling you with its soothing energy. After a while, you should feel calming energy flowing through your body.
Alternatively, you may place a Moonstone in the cradle of each shoulder and in the crevice at each hip.
By the way, this layout is also outstanding for easing PMS and menstrual cramps.
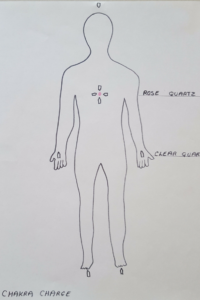
Self Healing Crystal Layout – Chakra Charge.
This layout allows you to balance out and to give a boost to any individual chakra that you have become aware needs some attention. In this example, we will work on the heart chakra and for this, we use a Rose Quartz. However, keep in mind that using any other heart chakra stone would be just as appropriate.
For any of the other chakras, simply select and use a crystal that corresponds with that chakra.
You will need 9 Clear Quartz points, preferably of similar size. You may use any reasonably sized crystal point, but those around 4cms or 1.5” are most suitable. I find laying on a white cloth most suitable. However, you may choose to lie on a coloured cloth or sheet that corresponds with the chakra colour.
Place a Clear Quartz point just below each foot, pointing up your leg. One at your crown, pointing inward and down your body. Then position your chosen chakra stone over its appropriate chakra location. In this case a Rose Quartz, on your heart chakra. Next, place a Quartz point above the chakra stone, pointing toward it. Another below it, also pointing at it. One on each side, also pointing in. Put the final two, one on each palm, pointing up your arm.
Often 5 to 10 minutes is all that is needed, however, you may stay up to 20 longer if you wish to take the time to relax and reflect.
Follow us on Facebook
© Ron and Sue Windred.
Disclaimer: The outlined metaphysical and healing properties in this website are for inspiration and reference. We gather this information and alleged properties from writings, books, folklore and various other sources. They are also dependent upon the attitude and beliefs of the individual. Furthermore they do not replace diagnosis or treatment by a qualified therapist or physician.

